PowerPoint in the Classroom

with Jim Jingle UNIT 1
Meeting PowerPoint
  • Trusty Toolbars
  • Handy Help
  • Techie Terms
  • Cool for School


PowerPoint in the Classroom is produced by ACT360 Media Ltd.
in conjunction with Microsoft Corporation.
Copyright 1998-2009. All rights reserved.

See our entire collection of online tutorials
by visiting www.ACTDEN.com


Trusty Toolbars


Nice to see you, PowerPoint. Or can I just call you Power? You're looking great by the way, I bet you've been working out.


I can't help but notice those toolbars of yours. They look just loaded with features. Schwarzenegger has nothing on you in terms of muscle. Can you folks back home see this? With toolbars like that, you can put together some really nifty presentations.


Finding the toolbars
The toolbars contain graphically illustrated buttons that you click to perform specific tasks in a program. PowerPoint 97 has four main toolbars, which can help you create your presentations quickly and easily.

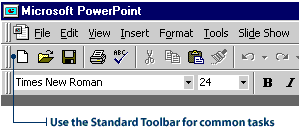
The Standard Toolbar is located at the top of the PowerPoint window, below the menu bar. It has buttons for common tasks such as saving, printing, checking spelling, and inserting charts and tables.

Standard Toolbar

The Formatting Toolbar is located just below the standard toolbar. Most of its buttons are for formatting text. Use these buttons to change the font type or size, make text bold or italic, indent text, and insert bullets.

Formatting Toolbar

Floating Toolbar tip


The Drawing Toolbar is located at the bottom of the PowerPoint window. It has tools for drawing shapes, adding lines and curves, and inserting text boxes and WordArt. It also has buttons for manipulating and formatting the objects you draw.

Drawing Toolbar

The Common Tasks toolbar is initially a floating toolbar. That is, it isn't anchored to an edge of the PowerPoint window. Use this toolbar to create a new slide, change the layout of a slide, or apply a design.

Common Tasks Toolbar

Note: If you can't see the Common Tasks Toolbar, you can make it appear using these steps: Click the View menu, point to Toolbars, then click the check box beside Common Tasks. A check mark indicates that a toolbar is activated.


Hmmm. With all these powerful toolbars, things can get pretty tangled up on your desktop. All those buttons must look like the freeway during rush hour. I bet you have a funny story about that.


Not really. People can move my toolbars where they need to at will. It's easy.


You mean you're powerful but fully flexible too?


Part boxer and part ballerina. I think I'm in love.

Moving the toolbars to new locations
All PowerPoint toolbars can be moved or docked to any side of the PowerPoint window. As well, docked toolbars, including the Standard Toolbar, the Formatting Toolbar, and the Drawing Toolbar, can be converted to floating toolbars.

A move handle on the left or top of the toolbar indicates that the toolbar is docked. A title bar indicates that the toolbar is floating.

Docked and Floating Toolbars


Here's how to move one of the toolbars to a new location:

    1. Click the move handle on a docked toolbar, or click the title bar on a floating toolbar.

    2. Holding down the mouse button, drag the toolbar to the new location.

Docking a toolbar
Try docking the Common Tasks toolbar to the top of the PowerPoint window. This will give you more working area on your PowerPoint window.

    1. Click the title bar on the Common Tasks toolbar.

    2. Drag the toolbar upwards, until the toolbar outline snaps into place along the edge of the program window.

If you see move handles on the toolbar, you know it is successfully docked.

Docking the toolbar


My producer is telling me we need to cut to a commercial break. Is there anything else you want to mention about toolbars?


Well, I have other toolbars... one for working with images, one for creating animation effects... and more...


Gee, you have a toolbar for everything. You're like James Bond with all these gadgets. Do you have a toolbar for making milkshakes?


I think that's planned for PowerPoint 2000. Ha ha ha . But seriously... I do need to be a little bit like James Bond when it comes to handling my mission of making good presentations.


Adding and removing toolbars
PowerPoint has several other toolbars to help you accomplish your tasks.

The Picture Toolbar has several buttons that are useful when you work with images. There are buttons for Contrast, Brightness, and Cropping. This toolbar will automatically appear when you insert clip art or pictures.

Picture Toolbar

The Animation Effects Toolbar has buttons for working with animations, and the Web Toolbar helps you create presentations on the Internet. There's also a Reviewing Toolbar, a WordArt Toolbar, and a Control Box Toolbar.

When you're a more advanced user, you may wish to add some of these toolbars to your PowerPoint window. Let's say you want to add the animation effects toolbar. Here's what you do:

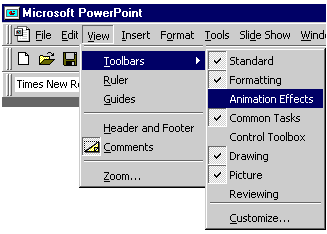
    1. Click the View menu, and then point to Toolbars.

    2. In the submenu, click the check box next to animation effects. An animation effects toolbar appears in the PowerPoint window.

selecting a toolbar

Removing a toolbar
PowerPoint lets you remove toolbars you don't need. Try removing the animation effects toolbar you just activated.

    1. Click the View menu, and then point to Toolbar.

    2. In the submenu, click the check box next to animation effects to deselect it.

The check mark disappears and the animation effects toolbar is removed from your PowerPoint window.


Handy Help


Your rise to stardom has been meteoric. You're at the top of the software heap, my friend. How do you do it? How do you handle all the pressures of churning out hit presentations? I bet it hasn't been easy.


It's been easy because I've had good help. My parents. My girlfriend. My agent. But especially, the Genius. He's my adviser, my friend, a shoulder to cry on. He's always there to give advice on making the best presentation. He anticipates problems and is there to help.


I could use a little advice myself. But I bet a big shot like him is impossible to get in touch with.


Actually, Jim, he's available for everyone. And he's just a click of the button away.


Activating and using the Office Assistant:
The Office Assistant is an animated help system that answers your questions, and offers tips and helpful suggestions as you work. The standard Office Assistant character is Mr. Clipit, an animated paperclip, but you can change the Office Assistant's character at any time.

To activate the Office Assistant, click the Office Assistant button on the Standard Toolbar.

Ofice Assistant button

Or click the Help menu, then click Microsoft PowerPoint Help.

Help Menu

The Office Assistant appears, ready to assist you.

Once the Office Assistant is activated, it "observes" your work and offers tips or suggestions. A yellow bulb above the Office Assistant indicates that it has a tip. To see the tip, click the bulb.

You can ask the Office Assistant to help you perform tasks in PowerPoint. Let's say you want to find out how to insert a graphic. Here's what you do:

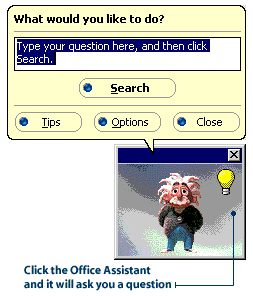
    1. Click the Office Assistant. A callout appears, asking you what you want to do.

Office Assistant

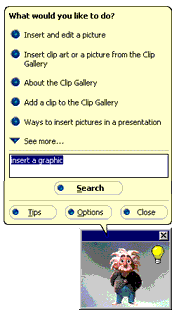
    2. Type in your request. For example, type "insert a graphic". A list of related help topics will appear.

    3. Select a help topic from the list. (Click See More for more options.) The help topic is displayed.

Help Topics

Office Assistant tip

Techie Terms


Using PowerPoint vocabulary
Here are some terms in PowerPoint 97 that are useful to know.

Slide: An individual screen in a slide show.

Presentation File: The file you save to disk that contains all the slides, speaker's notes, handouts, etc. that make up your presentation.

Object: Any element that appears on a PowerPoint slide, such as clip art, text, drawings, charts, sounds, and video clips. You can refer to a clip art object, a text object, a title object, a drawing object, etc.

slide objects

Slide Show: A series of slides displayed in sequence. A slide show can be controlled manually or automatically.

Transition: A special effect used to introduce a slide during a slide show. For example, you can fade in from black, or dissolve from one slide to another.

Transition Effects

Cool For School

UNIT 1

Obviously you're a teacher with a pioneering spirit. So, no doubt, you'll want to teach your students how to create multimedia presentations using PowerPoint. Before you get your students all excited about funky animations and nifty sound effects, you'll have to equip them with a few PowerPoint essentials.

First and foremost, you have to talk the talk. Introduce your students to PowerPoint vocabulary by doing a live demonstration of all the different terms you will be using. Explain the difference between a slide and an object. Show how a transition is a part of a slide show. And just to make sure everyone is on the same wavelength, follow-up your demonstration with a worksheet.

PowerPoint comes with many toolbars-fifteen of them, to be exact. Don't worry about introducing your students to all of them. Concentrate on the four main toolbars that appear when you first open the program.

You might want to consider introducing the toolbars one at a time. To start, you can hide all of the toolbars. When your students need to format text or add graphics, show them how to add the appropriate toolbar and teach them the function of each button.

The toolbar-by-toolbar approach sounds radical, but what better way to prevent your students from clicking every button in sight. Teaching PowerPoint one toolbar at a time also keeps your students focused and gives you a nice, systematic way of introducing the program's features and functions.

Before you introduce the Office Assistant to your students, consider whether it will be beneficial to them. Will your students be able to read and comprehend the words in Office Assistant? Can they navigate through the Help files without your assistance? Do you have enough class time to let students explore this feature? Will your students become as addicted to animating with the Office Assistant as you are?

Note: If you haven't discovered this yet, hold your mouse over the Office Assistant and click your "right" mouse button. Choose Animate! from the pop-up menu and be prepared for a surprise.