|
|
UNIT 2
Creating Slides
|
|
See our entire collection of online tutorials |
|
|
|
|
|
3. Click the Title Slide layout. It's the first in the list. The name Title Slide appears in the preview box.
Note: The PowerPoint dialog box appears only when you first launch the program. If you are already working in PowerPoint and want to create a new blank presentation, click the New button on the Standard Toolbar or follow these steps:
|
|
|
|
|
2. Type a title.
Congratulations! You've just created your first slide in PowerPoint 97.
|
|
|
Adding another slide
|
|
|
|
Moving from slide to slide
Let's say you've created several slides for your presentation. You've finished working on the last slide, and now you want to take a look at your other slides. Here's how you move from slide to slide in Slide View. To move to a previous slide:
To move to the next slide:
|
|
|
|
|
|
|
This is what you should see in Outline View:
Note: When you go to Outline View, PowerPoint automatically displays an Outline Toolbar on the left side of the window. It contains many useful tools for working in this view.
|
|
2. In the New Slide dialog box, click a slide layout, then click OK. A new slide icon appears in your outline.
2. Press the Enter key. A new slide icon will appear in your outline. |
|
If you want to add text to a new slide you've created in Outline View, follow these steps:
2. After the slide title, press the Enter key. PowerPoint adds a new slide. 3. Click the Demote button on the outline toolbar to convert the new slide to a text object.
4. Type your text.
5. To add another bullet point, press Enter. Note: With the exception of the title slide, any text you add will be formatted as a bullet point. |
|
To collapse all the slides in your outline:
|
|
|
|
|
|
|
|
|
|
|
|
|
If you are already working in PowerPoint, here's how you start the AutoContent Wizard:
3. In the Presentations list, click the AutoContent Wizard, and then click OK. The wizard will start.
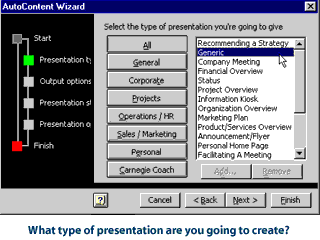
2. In the next dialog box, select the type of presentation you want to give, then click Next to advance to the next dialog box.
4. Click Finish. The AutoContent Wizard will display your presentation in Outline View. The outline is made up of sample slides, each of which has a suggestion for the type of information that should be entered in the slide. You can customize the information in the slides in either Outline View or Slide View.
|
|
|
|
|
|
PowerPoint also lets you customize the templates. For instance, you can change the background color or typeface of a template. |
|
If you are already working in PowerPoint, follow these steps:
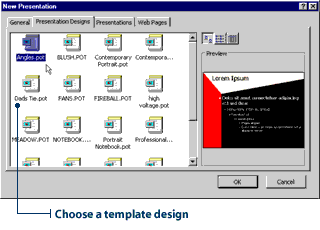
2. Click the Presentation Designs tab, and then click an appropriate template. The design will appear in the preview box.
|
|
|
|
|
|
|
|
Once you've saved the presentation for the first time, periodically save it by clicking the File menu, then clicking Save. Or, click the Save button on the Standard toolbar.
|
UNIT 2 PowerPoint gives you quite a few ways to create a presentation. If you want total control over the look and structure, you will likely build your slide show from the ground up. If you need a presentation in a hurry, the AutoContent Wizard is your new best friend. If you're great at organizing information, but can't match two colors if your life depended on it, then you'd better leave your slide show color scheme to PowerPoint's ready-made templates. That said, what's the best way to create a PowerPoint presentation with your students? The answer depends on two factors: time and function. Teaching your class how to create a presentation from scratch is time consuming, but it's worthwhile process. Not only will your students pick up valuable technology skills, they'll also have a blast creating slide shows that define their unique style. You, too, will find the do-it-yourself method the most rewarding as you watch your students breathe life into a blank presentation. The second consideration is function. What type of presentation do you want your students create? Is it going to be a science fair kiosk presentation, or a simple three-slide show? Of course, the bigger the show, the more help your students will need. Whatever method you choose, be sure that it meets your learning objectives. For example, if your goal is to teach your class how to organize information, you'll want your students to spend more time working on outlines and less on background colors. While we're on the topic, we have to point out our favorite PowerPoint feature for the classroom-the Outline View. There's very little razzle-dazzle to this feature, which is probably why we like it so much. If you want your students to concentrate on the main elements of a presentation, start them out in Outline View. This modest view will keep your kids focused on researching, organizing, and writing their presentations. After your students have created a logical outline, you can introduce the fancy fonts and mesmerizing transitions. Your students can follow your instructions for creating an outline, or they can use one from the AutoContent Wizard. The Generic presentation has excellent headings and writing instructions for a simple presentation or a classic essay. When introduced during the research stage of a project, you can even use this outline to teach the finer points of note-taking. |