|
|
UNIT 8
Taking It With You
|
|
See our entire collection of online tutorials |
|
|
|
|
|
If the destination computer doesn't have PowerPoint 97 installed, include the PowerPoint Viewer when you pack the presentation. Just make sure the destination computer has the necessary system requirements. The PowerPoint Viewer works for Windows 95 and Windows NT, but it doesn't work for Windows 3.1. Follow these steps to pack your presentation:
2. Open the presentation you want to pack. 3. Click the File menu, then click Pack and Go. The Pack and Go Wizard dialog box appears.
(a) When asked which presentation you want to pack, select Active Presentation.
(c) Select Include linked files to include linked files and fonts. (d) Select Viewer for Window 95 or NT if the destination computer doesn't have PowerPoint 97 installed. 5. When you finish selecting options, click Finish. The Pack and Go Wizard compresses your presentation to your floppy drive. If the presentation is too big to fit on one disk, it will prompt you to insert disks as required.
|
|
|
|
|
2. On the Windows Desktop, double-click the A: drive icon to display the contents of the disk.
4. Select a folder on the computer's hard-drive, then click OK. When the presentation is installed, a message box appears confirming the installation. It also asks you if you want to run the slide show now. 5. Click Yes to run the show immediately. If you don't want to run the Slide Show immediately, follow these steps later, when you do want to run your presentation.
2. If you didn't include the PowerPoint Viewer, double-click the presentation to open it. 3. If you included the PowerPoint Viewer, double-click PpView. The Microsoft PowerPoint Viewer dialog box will appear.
|
|
|
|
|
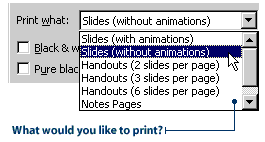
Follow these steps to print your presentation.
3. In the Print what list box, select what slide contents you want printed.
5. Click OK to print the presentation.
|
|
|
|
|
|
Well Hocus Pocus Dominocus! Tell us how to conjure up the Internet Assistant Wizard! |
2. Click the File menu, and then click Save As HTML. The Internet Assistant Wizard will appear.
The Wizard presents you with options for converting the presentation: In the dialog boxes that appear, you define the page layout, the type of graphic files that are created (GIF, JPEG or PowerPoint animation), and the size of graphical images. As well, you provide information including your e-mail address and the Home Page Address. In the Colors and Buttons dialog box, you define page color and button style. In the Layout Options dialog box, you indicate where navigation buttons are placed.
|
|
|
|
2. Click the File menu, then click Open. The Open Internet dialog box will appear.
|
|
|
|
|
|
|
|
|
It's best to follow the instructions that come with the converter. But just to show you how easy it is, here are the steps for connecting a converter called AVerKey Plus to a VCR.
2. Take the VGA output cable out of your computer and attach it to the VGA OUT port on the back of the converter. 3. To see the video displayed on both your computer and television screen, plug the converter's VGA cable into the VGA IN port on the back of the converter. Then, plug the other end into the VGA OUT port on your computer. 4. Take the black video cable and plug it into the TV OUT port on the converter. Then attach the other end to the VIDEO IN port on your VCR. 5. If your PowerPoint presentation has sound clips or effects, you can transfer them to video, too. Simply plug audio cables into your computer's audio output jacks, and attach the other end to the audio input jacks on your VCR. 6. Turn on all of the machines. Open your PowerPoint program. 7. Insert a video tape into your VCR, then press Record on the machine. Run the presentation on your computer.
|
Pack and Print Precautions
Massive Multimedia
Multimedia files - like sound and video clips - are quite large, and they take up a lot of disk space. If you don't want presentation files taking up four or five floppy disks, you should keep the multimedia files to a minimum. The less disks used, the less chance of them getting lost.
Keep It Together
When students create and save their presentations, make sure they save them to their own individual folders. They should also transfer any multimedia files to this same directory - the transfer should be done as soon as a new multimedia file is added to the presentation.
Print Check
To save paper and ink:
2. Click the Properties button. A printer dialog box will appear. 3. Click the Setup tab and select the EconoFast radio button. 4. Click the Paper tab and select the Book or Tablet radio buttons. This will save paper by printing the presentation on both sides of each page. 5. Click OK on the printer dialog box and then click OK on the Print dialog box. |