![]()
|
|
|
|
|
|
|
|
|
|
|
|

|
![]()
|
|


The work window is where you enter and edit information, and where you format the table. If you click outside of the work table, the table will disappear. To make the work table reappear, place the pointer on the slide until it changes into a four-headed arrow, then double-click. The work table is easier to work with if you add gridlines. This way, you can see all the columns and rows. To add gridlines to your table:
2. Click the Table menu, then click Show Gridlines.

Next, you will type information into the work table.
2. Type the word January. 3. Press the TAB key on your keyboard. The insertion point is now in the second column of the first row. 4. Type the word February. 5. Press the TAB key to move to the next column, and type the word March. Navigation Tips: To move to a previous column in a row, press SHIFT + TAB. You can also move around the table by simply clicking where you want to move to, or by using the arrow keys on your keyboard. After you've finished typing, click outside the work table to exit the work window.

|
|
|
|
|
|
|
|
|
|

In PowerPoint you can adjust the height and width of the cells. The following steps will show you how to adjust the height and width of cells in your table.
2. First, try making the cells in the first column narrower. (a) Place the pointer on the gridline between the first and second column. The pointer will change into a two-headed arrow.

(c) Click and drag the gridline to the right to make the cells wider again.


(a) Place the pointer on the gridline between the first and second rows. The pointer will change into a two-headed arrow. (b) Click and drag the gridline downwards. The cells become taller. (c) Click and drag the gridline upwards to make the cells shorter again. |
|
|
|

|
|
|
|
![]()
|
|

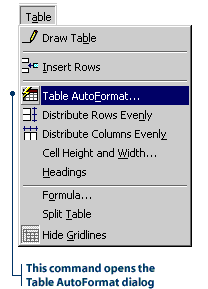
Try jazzing up your table using the Table AutoFormat command in the Table menu.
2. Click the Table menu, then click Table AutoFormat. The Table AutoFormat dialog box appears.

4. Click OK.

|
![]()
|
|

|