PowerPoint in the Classroom

with Jim Jingle UNIT 1
Meeting PowerPoint
  • Riveting Ribbon
  • Handy Help
  • Techie Terms
  • Cool for School


PowerPoint in the Classroom is produced by ACT360 Media Ltd.
Copyright 2008. All rights reserved.

See our entire collection of online tutorials
by visiting www.ACTDEN.com


Riveting Ribbon


Nice to see you, PowerPoint. Or can I just call you Power? You're looking great by the way, I bet you've been working out.


I can't help but notice that fancy Ribbon of yours. It looks positively loaded with features.
Did you score a new contract or your own reality TV series? Can you folks back home see this? With a Ribbon like that, you can put together some really sensational presentations.


Welcome to the Ribbon

The Ribbon is the completely new user interface in PowerPoint 2007, designed to make it easier and faster to create fantastic presentations. The Ribbon together with the Microsoft Office Button and Quick Access Toolbar will give you access to everything you'll need to do for a presentation.

The Ribbon is located near the top of the PowerPoint window, covering an area from left to right. The Ribbon is composed of tabs, each of which performs a key task.

The Ribbon

Click on the image to see the Ribbon in detail.


The main tabs are Home, Insert, Design, Animations, Slide Show, Review and View. When we cover the main tabs in more detail, you'll learn about the other tabs - Contextual tools and Program tabs - that only appear when you need them while performing certain tasks.

The main tabs


When you open PowerPoint, the tab always displayed to start out with is the Home tab. You start at the Home tab because it has all the common tasks you'll want to use in making your presentation.


Note: Moving from one main tab to another is simple, just click on the name of the main tab you want to go to. Everything associated with the tab you pick will appear, while the previous one becomes hidden.


The main tabs are organized into specific Groups containing graphically illustrated buttons. Each Group breaks a key task into subtasks. For example, the Home tab has 6 Groups: Clipboard, Slides, Font, Paragraph, Drawing, and Editing.

A Group in the Home tab

Within each subtask are more controls - either buttons, galleries or dialog boxes - that allow you to carry out a command. For example, there are 4 commands to choose from in Slides: New Slide, Layout, Reset and Delete.

Commands in the Slides Group


You'll notice that each command becomes highlighted as you move the mouse around in any group, such as Slides. When you have picked which command you want to do, click on it. The command will either execute, or you will be presented with options to select from first before the command is carried out.


Besides the Ribbon, one of the other two main features is the Microsoft Office Button. It is located in the top left area of the PowerPoint Window. You'll want to click on it when you want do tasks like print, save, open, publish, close and create a new presentation. Most importantly, it's where you go to shut down PowerPoint when you're done for the day.


Note: Click on the Microsoft Office Button ONCE to access it. If you double-click the Microsoft Office Button, PowerPoint will shut down if there have been no changes made to a presentation. If you have made changes, you will be asked if you want to save them. Pick Cancel or click the red X button to keep PowerPoint from shutting down.

Microsoft Office Button


The Microsoft Office Button also gives you to access to the PowerPoint options which control the features of the PowerPoint application itself. The options are organized into categories that include Popular, Proofing, Typography, Advanced and Customize. For example, you can change PowerPoint's default blue layout color to silver or black. The PowerPoint options are something to try when you become comfortable using the program. You will not need them to create your presentation.
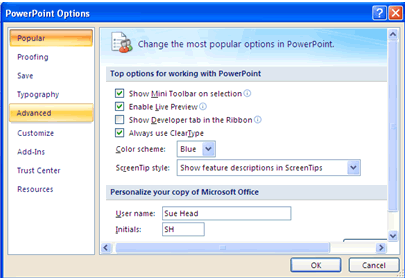
PowerPoint Options Dialog Box


The last feature you need to know about before starting to create a presentation is the Quick Access Toolbar. It is located at the top of the PowerPoint window, to the right of the Microsoft Office Button. As its name implies, this is where you want to go to quickly access tools you will use frequently. The Quick Access Toolbar by default has buttons for the common tasks of Save, Undo and Redo.

Quick Access Toolbar


You can add other tools to this bar such as Open, New and Spelling. You can even choose what order the icons appear in the Quick Access Toolbar. To see what other tools you might want to add, click on the arrow on the right. A drop-down list will appear. Click on the tool you want to add, for example, Print Preview. The Print Preview icon will now be added to the Quick Access Toolbar. Repeat this process to add other tools.

Add Buttons to the Quick Access Toolbar


Keyboard shortcut tip


Wow, that's a lot to digest. It's like being a kid in a candy store. Where do you begin?


No worries. You won't get lost. We'll just go one step at a time. I promise, it's easy - and fun.


More fun than a candy store?


Now Jim, how are you going to learn anything if you're thinking about food?


Getting familiar with the main tabs

The 7 main tabs in the Ribbon give you everything you need to make your presentation. As always, you'll start out with the Home tab, your base of operations if you like. Now it's time to see what the other main tabs can offer.

The name of each main tab implies what kind of tasks you'll find within it.

The Insert tab is where you go to add in objects to a slide as well as edit any objects you add. Objects include tables, images, clip art, shapes, WordArt, video clips, and audio clips. You can even import items from other programs like Microsoft Excel.

The Design tab is where you go to control how your entire presentation will look: it's theme, colors, fonts, style and even add in theme effects.

The Animations tab is where you go to add animation to any object as well as add transition effects to the slides.

The Slide Show tab is where you go when you want to test how your presentation will run. From this tab you can alter the timing of the slides, record narration, specify what slides get used in a show, and pick what mode it will run in.

The Review tab is where you go when your presentation is about finished, but you may want to do some final checks like spelling or use the thesaurus to replace some words. You can also add in comments to slides to provide some additional documentation.

The View tab is where you go when you want to switch between PowerPoint's views: Normal, Slide Sorter and Slide Show. From the View tab you can also change the formatting of a slide's master layout, re-arrange your slides, or use tools such as zoom and gridlines to help get your slide content exactly how you want it. If you have several presentations open, you use the View tab to organize and move about the different Windows.

As you can see, there are lots of Groups and Command buttons in each main tab, but you don't have to try and learn them now. We'll be covering in more detail all the crucial ones as we go along to help you make your presentation.


My producer is telling me we need to cut to a commercial break. Is there anything else you want to mention about tabs?


Well, I have other tabs and buttons that do some amazing things... but you can't see them in the Ribbon... not until you need them that is...


Gee, you have a button for everything. You're like James Bond with all these gadgets. Do you have a button for making
grande lattes?


I think that's planned for PowerPoint 20
10. Ha ha ha... But seriously, I do need to be a little bit like James Bond when it comes to handling my mission of making good presentations.


Accessing more features

It would be very hard to show all the options a task can do in the Ribbon. That's why many of the options are hidden until you need them. All that is usually needed to make them appear is a mouse click. Sometimes you don't have to do anything at all, they will become available automatically when certain tasks are chosen.


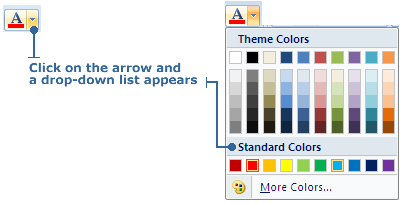
To the right of many Command buttons, you will find an arrow. When you click on it, a drop-down list will appear, showing all the options possible for that Command. Decide which option you want and then click on it.

Arrow reveals a drop-down list


Other Command buttons have a little box with a downwards pointing arrow inside it. When you click on it, a dialog box will open up, revealing the options you can choose from. The dialog box itself might have different tabs within it to better organize all the options.

Revealing the dialog box


A few Command buttons when clicked on will make a task pane appear. By default, the task pane will appear as a side bar to on the right side of the PowerPoint window. You can resize or move the task pane to where you like. To close the task pane, just click on the the X button in the top right corner.

The task pane you'll use the most is the one to apply custom animation effects to objects and slides. You'll learn about the functions in the Custom Animation task pane later on.

Task pane


Some features have too many options to be handled in a drop-down list or dialog box. When one of these features is activated, a Contextual tool or Program tab will open up as well.


Contextual tools are activated when working with objects such as tables, text boxes or pictures. When you click on an object, the Format tab appears to the right of the View tab. Above this is an another tab showing what tools you can access for the type of object you are working with. It will say Picture Tools if the object is a picture, Drawing Tools if it's a text box, and so on. Click on either Format or the tab above it to reveal its tools. Like other tabs, the Contextual ones contain Groups and Command buttons. Simply click outside of an object to hide the Contextual tools. The Home tab will appear.

Contextual tool


When you switch to certain modes or views, such as Slide Master, the main tabs in the Ribbon will be replaced with a different set, known as a Program tab. A Program tab contains all the commands and tools associated with a given view or mode. To close a Program tab, click on the red X button that is the last Group on the right. The Home tab will appear.

Program tab


Handy Help


Your rise to stardom has been meteoric. You're at the top of the software heap, my friend. How do you do it? How do you handle all the pressures of churning out hit presentations? I bet it hasn't been easy.


It's been easy because I've had good help. My parents. My girlfriend. My agent. But especially, an encyclopedic resource center. Full of hints, there to guide you with anything at all, or lead you to where there's more help to be found. It's always there to give advice on making the best presentation.


Girlfriend...right. Well, I could use a little advice myself. But I bet something so powerful is difficult to deal with.


Actually, Jim, it's available for everyone. And it's just a click of the button away.


Getting Assistance:
In PowerPoint 2007, help from hints to links to the online Microsoft Office resources is always easy to access. The first way PowerPoint 2007 offers help is with ScreenTips.

When you hold the cursor over any Command button, a small window appears with text telling you about the command, what it does. This is a ScreenTip.

ScreenTips

Some of the ScreenTips direct you to more assistance by telling you to click F1 or click the blue and white question mark button found at the far right of the Ribbon.

Enhanced ScreenTips

ScreenTips with full descriptions is the default setting. However, the ScreenTips feature can be limited or turned off completely. Access the Popular menu in PowerPoint Options by clicking on the Microsoft Office Button. In the Popular menu, go to ScreenTip Style and select how which option you want for ScreenTips.


Whenever you don't understand how to do something, press F1 or the question mark button and the PowerPoint Help window will appear.

Activate PowerPoint 2007 Help

PowerPoint 2007 Help


From here you can scroll through the Table of Contents on the left side to find popular topics for help with. Click on a main topic and it will expand to show you sub-topics. Click on a sub-topic and detailed information on the subject will be displayed in the right hand area of the dialog box.

Finding help within the Table of Contents


Alternatively, you can search for assistance using the right side of the dialog box which is a more graphical presentation of the help and how-to contents.

Browse Help and How-To


Another way to get help is to type keywords into the search box. Hit enter and PowerPoint Help will give you a list of results. Click on the relevant topic and detailed information on the subject will be displayed. Some of the results will be links to online demonstrations or tutorials found at Microsoft Office Online.

Searching help

The default when you type in a search is to search all of PowerPoint, which includes Microsoft Office Online. You can limit where your search is done by selecting it from the drop-down menu. To the right of the text box is a magnify glass icon and the word Search and a downwards arrow. Clicking on the arrow will make the drop-down menu appear.

Limiting your search


In the top area of PowerPoint Help there is a toolbar. It has all the key functions such as forward and back buttons, and a print button. The icon that looks like a house is the Home button. Like the Home tab, it takes you back to the start. So if you've gotten lost from searching multiple topics, click the Home button and you will return to the main menu of PowerPoint Help.

PowerPoint Help Toolbar


To close the PowerPoint Help window, click the X button in the upper right corner. Or, if want to keep PowerPoint Help close at hand, click on the minimize button - the second button from the left of the X button - which will place PowerPoint Help on your Windows Taskbar.

Office Assistant tip


Techie Terms


Using PowerPoint vocabulary
Here are some terms in PowerPoint 2007 that are useful to know.

Slide: An individual screen in a slide show.

Presentation File: The file you save to disk that contains all the slides, speaker's notes, handouts, etc. that make up your presentation.

Object: Any element that appears on a PowerPoint slide, such as clip art, text, drawings, charts, sounds, Flash objects, WordArt, SmartArt, photo album, and video clips. You can refer to a clip art object, a text object, a title object, a drawing object, etc.

Slide objects

SmartArt: Brand new to PowerPoint 2007 is this graphic tool which allows you to create a visual representation of information and ideas. As a chart is used to transform numeric data into a visual aid, a SmartArt graphic does the same thing for text such as lists. A SmartArt graphic can be simple or complex. SmartArt offers a wide range of shapes, designs, layouts and color schemes to be used to your advantage in visually representing processes, concepts, hierarchies and relationships in a dynamic way.

Slide Show: A series of slides displayed in sequence. A slide show can be controlled manually or automatically.

Transition: A special effect used to introduce a slide during a slide show. For example, you can fade in from black, or dissolve from one slide to another.

Transition Effects


Cool For School

UNIT 1

Obviously you're a teacher with a pioneering spirit. So, no doubt, you'll want to teach your students how to create multimedia presentations using PowerPoint. Before you get your students all excited about funky animations and nifty sound effects, you'll have to equip them with a few PowerPoint essentials.

First and foremost, you have to talk the talk. Introduce your students to PowerPoint vocabulary by doing a live demonstration of all the different terms you will be using. Explain the difference between a slide and an object. Show how a transition is a part of a slide show. And just to make sure everyone is on the same wavelength, follow-up your demonstration with a worksheet.

PowerPoint with it's Ribbon and 7 main tabs is packed with tasks that lead to even more tools. There's also the new Microsoft Office Button and Quick Access Toolbar. Don't worry about introducing your students to everything. Concentrate on explaining how to navigate the Ribbon, Microsoft Office Button and Quick Access Toolbar as well as covering the essential tasks in the four main tabs that will be used most often: Home, Insert, Slide Show and Animations.

You might want to consider introducing the features of the Ribbon tab by tab. When your students need to format text or add graphics, show them which tab, which Group and then which subtask is needed, and teach them the function of each necessary Command button. Teaching PowerPoint one tab at a time keeps your students focused and gives you a nice, systematic way of introducing the program's features and functions.

Unfortunately, you can't alter the number of tabs in the Ribbon to be able to introduce them one by one. It will be a little hard to keep students from clicking every button in sight, especially when they realize you can see instant previews of functions before applying them, such as themes and transition effects. You might get a little crazy trying them out yourself.

While you cannot alter the Ribbon, you can minimize it. It's the best you can do to hide tabs until you want to introduce them. Double-clicking on a main tab will minimize the Ribbon for a short time. A single-click on a given main tab will make that one entire tab visible again. Double-clicking on a main tab will make the whole Ribbon appear. To keep the Ribbon minimized longer, select the Minimize the Ribbon option from the drop-down list in the Quick Access Toolbar. However, double-clicking on any main tab will deactivate the minimize feature, making the whole Ribbon visible once more.


Before you introduce PowerPoint Help to your students, consider whether it will be beneficial to them. Will your students be able to read and comprehend the topics in PowerPoint Help? Can they navigate through the Help files without your assistance? Do you have enough class time to let students explore this feature? The ScreenTips feature will provide helpful hints to students as to what the commands in the Ribbon can do.